
Table of Contents:
- Using Your Office Phone
- Phone Settings
- How to Access Voicemail by Phone from off-campus
- Initial Voicemail Set Up
- How to Set Up Greetings
- Connecting a Headset
Using Your Office Phone
Caller ID (Inbound and Outbound)
Caller ID is enabled for all inbound calls. Outgoing calls will display your college DID # to the call recipient. If you need to mask your DID, dial 8 then the normal 8 plus outside number for the outbound call. The main college Caller ID will show instead of your DID #.
Audio Path Selection
When you make or receive a call, the audio path goes to the last device used by you, either the handset, the headset, or the speakerphone. The following list describes each scenario:
- Pick up the handset when you make or answer a call, and all of your calls are routed to your handset until you select
 Headset or
  Speakerphone.
 - Select Headset when you make or answer a call, and all of your calls are routed to your headset until you pick up the handset or select Speakerphone.
If your administrator sets your headset as the audio path on your phone, then you can remove the handset and use your headset. This is ideal for anyone who prefers the convenience of a headset. But you must still select ![]() Headset the first time you handle a call.
Headset the first time you handle a call.
- Select Speakerphone when you make or answer a call, and all of your calls are routed to your speakerphone until you pick up the handset or select Headset.
Make a Call
Use your phone just like any other phone to make a call.
For external calls from the college:
- Dial 8, enter an external number, and pick up the handset.
- Dial 8, enter an external number, and press Call.
For internal calls from the college:
- Enter a four-digit extension number and pick up the handset.
- Enter a four-digit extension number and press Call.
For emergency calls, dial 911 and pick up the handset or press Call.
Make a Call with the Speakerphone
Use your speakerphone for hands-free calling. Keep in mind that your coworkers might be able to hear your call too.
- Enter a number using the keypad.
- Press Speakerphone.
Make a Call with a Standard Headset
Use your headset for hands-free calling that won't disturb your coworker and gives you some privacy.
- Plug in a headset.
- Enter a number using the keypad.
- Press Headset .
Softkey, Line, and Feature Buttons
You can interact with the features on your phone in several ways:
- Softkeys, located below the screen, give you access to the function displayed on the screen above the softkey. The softkeys change depending on what you are doing at the time. The More... softkey shows you that more functions are available.
- Feature and line buttons, located on either side of the screen, give you access to phone features and phone lines.
- Feature buttons—Used for features such as Speed dial or Call pickup, and to view your status on another line.
- Line buttons—Used to answer a call or resume a held call. When not used for an active call, used to initiate phone functions, such as the missed calls display.
Feature and line buttons illuminate to indicate status.
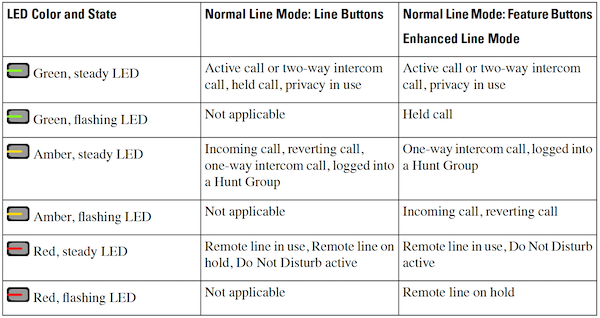
Badged Icons
If you have missed calls, the missed call icon, and a counter showing the number of missed calls, display on your phone desktop. If you receive a voicemail, the missed call icon changes to the voicemail icon and voicemail counter until you listen to your messages.
In addition, if you have more than one call on a line, either the held icon or the off hook icon change to show the number of calls.
Phone Settings
How to Change the Wallpaper
There are several SCC custom wallpapers and generic wallpapers for you to choose from to customize your phone screen appearance
- Press Applications
- Navigate Settings - Wallpaper
- Select a wallpaper option and perform any of these steps:
- Press Preview to see the wallpaper on your phone screen.
- Press Set to apply the wallpaper to the phone.
- Press Exit.
How to Change Ring Tone
You can change the sound that your phone uses for incoming calls.
- Select Settings > Preferences > Ringtone.
- Press Applications .
- Select Settings > Ringtone.
- Select a line.
- Scroll through the list of ringtones and press Play to hear a sample.
- Press Set to use the ringtone.
Change the Font Size
You can change the font size on your phone to make the screen easier to read. However, if you increase the font size, some messages might be truncated.
The font size affects the following labels:
- call screen (caller name and feature key labels)
- caller name in Recents
- line labels on the phone screen
- Press Applications
- Select Settings > Font Size
- Select a font size and press Set
- Press Exit to return to the Applications window
Bluetooth and Your Phone
If your phone supports Bluetooth, use a Bluetooth headset and connect your mobile phone or tablet to the phone.
Bluetooth connections work best when you're within 3 to 6 feet (1 to 2 meters) from your phone, but you might be able to be as far away as 66 feet (20 meters). The Bluetooth connection can degrade if you have a barrier (wall, door, window), large metal object, or other electronic devices between your phone and the connected device.
To connect a mobile device or headset to your phone with Bluetooth, start by pairing the device with your phone. You can pair up to 50 mobile devices and Bluetooth headsets with the phone.
After the headset or mobile device is paired, the phone connects to the headset or mobile device when the headset or mobile device is turned on.
When you use a Bluetooth headset and mobile devices with your phone, keep these things in mind:
- The last Bluetooth headset or mobile device connected with the phone is the default device that the phone uses.
- You can connect one mobile device (phone or tablet) and one Bluetooth headset at the same time.
- The phone can connect to only one paired mobile device at a time. If your mobile phone is connected and you turn on your tablet, the tablet connects to the phone and the mobile phone disconnects.
- When your Bluetooth headset and your mobile device are connected to the phone, you cannot use the Bluetooth headset to answer desk phone calls from the mobile device.
How to Access Voicemail
From your office phone:
- If you have more than one line, press the appropriate line key.
- Press Messages
 .
. - Follow the voice prompts.
From off-campus:
- Dial 828.339.4001 and follow the prompts.
- Enter your ID (4-digit phone extension) followed pound (#). Enter your PIN number following by pound (#).
During message summary or playback, you can press the following numbers:
- 1 - restart message summary or playback
- 2 - save message
- 3 - delete message
- 4 - reply to message
- 5 - forward message
- 6 - save message as new
- 7 - go back 3 seconds or, if paused, go back 3 seconds and continue playback
- 8 - pause message or, if paused, continue playback
- 9 - go forward 3 seconds or, if paused, go forward 3 seconds and continue playback
- # - skip summary or message
Initial Voicemail Set Up
If this is your first time accessing the Cisco Unity Voicemail System and you have not setup a pin number, you must first dial from your own phone extension.
- Dial 5000 or press the Messages button to access the Cisco Unity Voicemail System.
- Enter a pin number now followed by pound (#). (default pin number 1235789)
You are prompt to setup a recorded name, a personalized greeting and to change your pin number. To exit the initial setup menu, press star (*).
How to create a recorded name that identifies you to callers:
- The system prompts you that there is no recorded name. To record a new name, press 1.
- At the tone, please say your first and last name. When finished, press pound (#).
- Your newly recorded name plays. Press pound (#) to keep it, or 1 to re-record.
How to change your PIN number:
- Enter your new PIN number, which must be at least 5 digits. Press pound (#) when finished.
- Enter your new PIN number again to confirm, then press pound (#).
How to Set Up Greetings
Greetings are messages that callers hear when they reach your voicemail. You can have the following greetings:
- Standard Greeting - the normal greeting played to callers when they reach your voicemail. This can be either the default system greeting ("Sorry, <extension xxxx>/<user name> is not available") or a greeting that you have recorded and chosen as your own standard greeting.
- Alternate Greeting - the alternate greeting that is recorded by you and is turned on or off using the voice-mail menu. This greeting is used as an alternative to your standard greeting; for example, if you are on vacation, you can record a special greeting that is played to callers during the time that you are away.
- Login to your Voice Mail by pushing the Messages button on your phone.
- Press 4 to access the Setup Options menu.
- Press 1 to access the Greetings menu. Your active greeting plays.
- To rerecord your current greeting, press 1. See "Rerecording Your Current Greeting".
- To turn on or turn off your alternate greeting, press 2. See "Turning Alternate Greetings On and Off".
- To rerecord your standard and alternate greetings, press 3. See "Rerecording Your Standard Greeting" and "Rerecording Your Alternate Greeting".
- To hear all greetings, press 4. See "Reviewing All Greetings".
How to record a personal greeting:
- The standard greeting (“Sorry, <extension xxxx>/<user name> is not available”) plays. To keep this greeting, press pound (#).
- To record a new standard greeting, press 1. At the tone, please record your greeting. When finished, press pound (#).
- Your newly recorded greeting plays. To accept this greeting press pound (#). To re-record your greeting, press 1.
Rerecording Your Current Greeting
- After your current greeting plays, press 1 to rerecord your current greeting.
- At the tone, speak your greeting. When finished, press #.
- Your newly recorded greeting plays. To accept this greeting and continue, press #. To rerecord, press 1.
Turning Alternate Greetings On and Off
- To turn on or turn off your alternate greeting, press 2 in the Greetings menu.
- If your alternate greeting is turned on, the system plays your alternate greeting. Press 2 to turn off your alternate greeting.
If your alternate greeting is not turned on, press 2 to turn it on.
If you have not yet recorded an alternate greeting, or want to rerecord your alternate greeting, perform the steps in Rerecording Your Alternate Greeting.
Rerecording Your Standard Greeting
To rerecord your standard greeting:
- In the Greetings menu, press 3.
- Press 1 to rerecord your greeting.
- At the tone, speak your greeting. When finished, press #.
- Your newly recorded greeting plays. To accept this greeting and continue, press #. To rerecord, press 1.
Rerecording Your Alternate Greeting
To rerecord your alternate greeting:
- In the Greetings menu, press 3.
- Press 3 to rerecord your greeting.
- At the tone, speak your greeting. When finished, press #.
- Your newly recorded greeting plays. To accept this greeting and continue, press #. To rerecord, press 1.
Reviewing All Greetings
- To listen to all greetings, press 4 in the Greetings menu. Your standard greeting, alternate greeting, and current greeting play.
- You can perform the following actions:
- To rerecord the current greeting, press 1.
- To turn on or off your alternate greeting, press 2.
- To rerecord other greetings, press 3.
- To repeat the review of all of your greetings, press 4.
How to send a Message
- Perform the steps in “To Access Cisco Unity Express by Phone” to reach the main voice-mail menu.
- Press 2.
- (Optional) Address message by name (default), or press pound pound (#) (#) to switch from addressing by name to addressing by number (extensions). Press pound (#) to confirm selection. Press 1 to add another number, or go to next step.
- Press pound (#) to start recording.
- Press pound (#) to stop recording.
- Press 1 for additional message options and to address message if you did not do so earlier, or go to next step.
- Press pound (#) to send.
How to Pick Up Calls with your Own Group
Call Pickup allows you to pick up incoming calls within your own group. In this case, a group is any organization of Cisco IP Phone extensions, as defined by your system administrator. (Not all users are in a pickup group.)
When an incoming call is received on an extension that belongs to the same group as that of your Cisco IP phone, follow these steps to answer that call:
- Go off-hook on any line that has a Call Pickup group associated with it.
- Press the softkey under More and then the softkey under Pickup.
- Press the softkey under Answer.
How to Transfer Calls
- From an active call, press the Transfer
 button
 - Enter the target number.
- Recommended - Wait for the transfer recipient to answer and announce the caller being transferred.
- Press Transfer again to complete the transfer.
How to Make Conference Calls
- From a connected call, press the Conference
 button.
 - Enter the participant's phone number.
- Wait for the call to connect.
- Press Conference again to add the participant to your call.
- Repeat to add additional participants.
Connecting a Headset
Third Party Headsets
Cisco performs internal testing of third-party headsets for use with Cisco IP Phones. But Cisco does not certify or support products from headset or handset vendors. Check with the headset manufacturer to confirm whether you can use it with your Cisco phone.
Headsets connect to your phone using either the USB or the auxiliary port. Depending upon your headset model, you have to adjust your phone's audio settings for the best audio experience, including the headset sidetone setting.
If you have a third party headset, and you apply a new sidetone setting, then wait one minute and reboot the phone so the setting is stored in flash.
The phone reduces some background noise that a headset microphone detects. You can use a noise canceling headset to further reduce the background noise and improve the overall audio quality.
If you are considering a third part headset, we recommend the use of good quality external devices; for example, headsets that are screened against unwanted radio frequency (RF) and audio frequency (AF) signals. Depending on the quality of headsets and their proximity to other devices, such as mobile phones and two-way radios, some audio noise or echo may still occur. Either the remote party or both the remote party and the Cisco IP Phone user may hear an audible hum or buzz. A range of outside sources can cause humming or buzzing sounds; for example, electric lights, electric motors, or large PC monitors.
Sometimes, use of a local power cube or power injector may reduce or eliminate hum.
Environmental and hardware inconsistencies in the locations where Cisco IP Phones are deployed mean that no single headset solution is optimal for all environments.
Bluetooth Headsets
You can use a Bluetooth headset for your calls if your phone supports Bluetooth. When you use Bluetooth headsets with your phone, keep in mind:
-
If you have both a Bluetooth headset and a standard headset attached to the phone, only one type of headset works at any time. When you enable one headset, the other is automatically disabled.
-
If you use a USB headset, both the Bluetooth and analog headset are disabled. If you unplug the USB headset, you need to enable the Bluetooth or standard headset.
-
For optimum headset coverage, use your Bluetooth headset within 10feet (3meters) of the phone.
- Your phone supports the Bluetooth Handsfree Profile. If your Bluetooth headset supports these features, you can use your headset to:
- Answer a call
- End a call
- Change the headset volume for a call
- Redial a number
- View Caller ID
- Reject a call
- Divert a call
- Place a call on hold by answering an incoming call • End a call by answering an incoming call
Connect a Headset to Your Phone
Each type of wired headset, adapter, or base connects to a phone using a different port and a different type of connector and cable. Common types include an RJ connector, a USB connector, and a Y-cable.
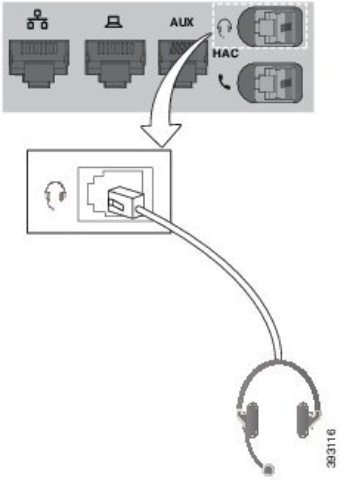
Connect a Standard Headset
You can use a standard headset with your desk phone. Standard headsets plug into the headset jack on the back of the phone with an RJ-type connecter.
Connect a USB Headset
When you use USB headsets with your phone, keep in mind the following:
- You can use only one headset at a time. The most-recently connected headset is the active headset.
- If you are on an active call and unplug a USB headset, the audio path does not change automatically. Press the Speakerphone button or pick up the handset to change the audio.
Your phone may have more than one USB port, depending upon your model. The Cisco IP Phone 8851 and 8851NR has one USB located on the side of the phone. The Cisco IP Phone 8861, 8865, and 8865NR have two USB ports, located on the back and side of the phone.
You may have to remove the plastic cover to access the side USB ports.
Add a Bluetooth Headset
- Make your Bluetooth headset discoverable. Press Applications
 .
. - Select Bluetooth > Add Bluetooth device.
- Your phone searches for discoverable accessories.
- Select your headset and press Connect.
- (Optional) If prompted, enter the PIN for your headset.
Disconnect a Bluetooth Headset
- You should disconnect your Bluetooth headset before you use it with another device.
- Press Applications . Select Bluetooth.
- Select a Bluetooth headset.
- Press Disconnect.
Remove a Bluetooth Headset
Remove your Bluetooth headset if you aren't going to use it with your phone again.
- Press Applications .
- Select Bluetooth.
- Select a Bluetooth headset and press Delete.
Test Your Microphone
Check your microphone when you first install it, and before you begin a call.
- Press Applications .
- Select Accessories and then your headset.
- Navigate to Setup > Microphone > Test.
- Press Record and speak into the microphone.
- Press Stop Rec when you finish speaking.
- Press Play to review your test recording.
